Buzzer Shield
The Buzzer Shield is a D1 Mini form factor shield, featuring a buzzer which can be used for generating sounds.
The buzzer is controlled by simply toggling the appropriate pin at the specific frequency that we want to hear. We could do this by repeatedly setting our pin high, waiting for a period, and then setting it low again, however this would be very laborious. Instead, we’re going to use a technique called Pulse-Width Modulation, (PWM). This is a feature of our hardware (so it’s very fast and stable, instead of relying on a software implementation), and we can set it up and control it using the MicroPython PWM function.
Make Some Noise
Warning
While it is possible to plug shields in to the device while it is powered (plugged in to your computer), it is not recommended! As such, please remember to unplug the USB from your board prior to connecting or disconnecting any shields, or else you risk damaging the shield or the board.
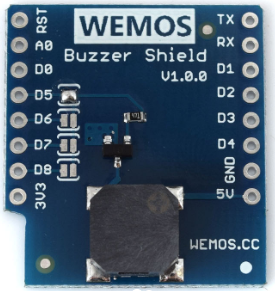
In order to start working with the buzzer, we’ll need to connect the shield to our TTGO board. If there is already a shield connected to your board (such as the LED Matrix shield from the previous section), then first remove this. Then plug the buzzer shield into the board – the large, black component (the buzzer!) should be over the USB port of the main board. Then simply align the 8 pins on either side with the sockets on the main board and push them together!

Note the large black component over the USB connection
Now we’ve got the shield on the board, connect to the board with your USB again, and get into Mu. Now before we start using the buzzer…
Warning
When we use the buzzer, we tell it to produce a set frequency - it will keep doing this indefinitely until we tell it to stop (or you unplug it)! This may be loud / unintended – as such, always make sure you know how to disable the buzzer (will be in the code below), and where possible have your scripts copy + pasted in or running from a file (instead of typing the commands into the REPL) with a the buzzer disabling at the end of the script (after a delay) so that we’re only getting sounds when we want them!
Now that we’ve got that out of the way, lets make some noise:
1 2 3 4 5 6 7 8 9 10 | import machine
import d1_mini
import time
buzzer_pin = machine.Pin(d1_mini.D6, machine.Pin.OUT)
buzzer = machine.PWM(buzzer_pin)
buzzer.freq(1047)
buzzer.duty(50)
time.sleep(1)
buzzer.duty(0)
buzzer.deinit()
|
If all went well, your buzzer should have made a (1 kHz) beep for 1 second, and then stopped! Now lets run through what we just did:
- Imported the MicroPython
machinemodule – we need this to configure our pin to control the buzzer - Imported our
d1_minimodule – we need this to get the pin information to then configure the correct pin to use for the buzzer - Imported the MicroPython
timemodule – we’re going to use this to add delays to the code - Created an object that controls pin connected to the buzzer, and set it as an output (as we will be driving the buzzer)
- Created a new object that gives us PWM control over the buzzer pin
- Set the PWM frequency to 1047 hertz – note that this does not generate any noise by itself, as the PWM defaults to having a duty cycle of 0 (that is, it is enabled 0% of each cycle)
- Set the PWM duty cycle to 50 – the duty cycle is a 10 bit number (has a maximum of 1023) so by setting it to 50, it will be enabled roughly 5% of the time. This is what makes it buzz!
- Delays code execution by 1 second – this gives us an opportunity to hear it buzzing
- Sets the PWM duty cycle to 0 – stops the buzzer producing any noise (as it is once again enabled 0% of the time)
- Deinitialises the buzzer – this should be done once the buzzer is not being
used, and the buzzer reinitialised (via
buzzer = machine.PWM(buzzer_pin)) if we want to use it again. NOTE: If we don’t do this and then we change thebuzzer_pinvariable in any way (such as running the above code again, re-settingbuzzer_pin), the buzzer will stop working and we will be required to unplug and re-plug the board to get it to work again!
A couple of the numbers in here may seem a tad arbitrary, so lets explain them a bit better.
We used a frequency of 1047 because this is a nice “C” note and the buzzer has a peak frequency response between 1 and 3 kHz – this is the area where it provides the best results. It will still work outside this range however!
We used a duty cycle of 50 to reduce the volume of the sound output. Peak volume is at 50% duty cycle (setting of ~512), however due to the logarithmic nature of sound, we only need a small amount of this to make a relatively loud buzz. Because the buzzer generates sounds by alternating the voltage over the diaphragm, moving closer to 100% duty cycle has the same effect as being close to 0% duty cycle. Feel free to try buzzing at 50% duty cycle to see why we reduced the output!
Being able to make a sound is nice, but it would be even nicer to make a nice sound. First of all, lets define the frequencies of some specific notes:
1 2 3 4 5 6 7 8 9 10 11 12 13 14 15 16 17 18 19 20 21 22 23 24 | C6 = 1047
CS6 = 1109
D6 = 1175
DS6 = 1245
E6 = 1319
F6 = 1397
FS6 = 1480
G6 = 1568
GS6 = 1661
A6 = 1760
AS6 = 1865
B6 = 1976
C7 = 2093
CS7 = 2217
D7 = 2349
DS7 = 2489
E7 = 2637
F7 = 2794
FS7 = 2960
G7 = 3136
GS7 = 3322
A7 = 3520
AS7 = 3729
B7 = 3951
|
These are taken from the Pyboard “Play Tone” page – you will see that there are more notes on that page. We’re not defining the lower range as two octaves covering our peak frequency response will serve us fine.
Now lets create a function that will allow us to play a song by passing it a buzzer object, a list of notes, the delay between each note, and an optional duty cycle to use when playing a note:
1 2 3 4 5 6 7 8 9 10 11 | def play(buz_pin, notes, delay, active_duty=50):
buz = machine.PWM(buz_pin)
for note in notes:
if note == 0: # Special case for silence
buz.duty(0)
else:
buz.freq(note)
buz.duty(active_duty)
time.sleep(delay)
buz.duty(0)
buz.deinit()
|
To put it into action, lets create a song by defining a list of notes, and then
play() it:
1 2 3 4 5 6 7 8 9 10 11 12 13 | song = [
E7, E7, 0, E7, 0, C7, E7, 0,
G7, 0, 0, 0, G6, 0, 0, 0,
C7, 0, 0, G6, 0, 0, E6, 0,
0, A6, 0, B6, 0,AS6, A6, 0,
G6, E7, 0, G7, A7, 0, F7, G7,
0, E7, 0, C7, D7, B6, 0, 0,
C7, 0, 0, G6, 0, 0, E6, 0,
0, A6, 0, B6, 0,AS6, A6, 0,
G6, E7, 0, G7, A7, 0, F7, G7,
0, E7, 0, C7, D7, B6, 0, 0,
]
play(buzzer_pin, song, 0.15)
|
With any luck we should have heard a recognisable little tune! We’ve now set up a framework to allow us to play arbitrary songs – neat!
Exercises
Time to take those concepts and put them into action! The following subsections detail different exercises that can be accomplished using the techniques covered so far.
Alerts
Set up a success() function that you could easily put into a future project
that utilises the buzzer to play a success notification (the audio equivalent
of a green tick). What that sounds like is up to your imagination!
Extension: Make a failure() function for when things don’t quite go as
planned.